
Have you ever wanted to capture every moment on your iPhone screen? Well, look no further because we have the ultimate step-by-step guide to turn on screen recording on your iPhone.
Whether you want to record a tutorial, showcase your gaming skills, or simply save a funny video, screen recording is a powerful tool that can fulfill all your needs.
So, get ready to unlock the hidden potential of your iPhone and discover how you can effortlessly capture your screen with just a few taps.
Stay tuned for this exclusive guide that will revolutionize the way you use your iPhone.
Check Your Iphone’s Software Version
To check your iPhone’s software version, simply navigate to the Settings app. Once you open the Settings app, scroll down until you find the General option. Tap on General, and then tap on About. Here, you’ll see various information about your iPhone, including the software version.
The software version is indicated by a number, such as iOS 14.5.1. This number represents the latest software update that’s currently installed on your device.
It’s important to regularly check your iPhone’s software version to ensure that you have the most up-to-date features and security patches. If you notice that your software version isn’t the latest, you can manually update your iPhone by going back to the main Settings menu, tapping on Software Update, and following the prompts to download and install the latest update.
Keeping your iPhone’s software up to date is crucial for optimal performance and security. So, remember to check your software version regularly and update as needed.
Open the Control Center on Your Iphone
Now that you have checked your iPhone’s software version, let’s move on to opening the Control Center on your device.
The Control Center is a convenient feature that allows you to access various settings and functions quickly. To open the Control Center, start by swiping down from the top right corner of the screen. On older iPhone models, you need to swipe up from the bottom of the screen. Once you start the swipe-down or swipe-up gesture, the Control Center will appear on your screen.
It will display a variety of icons and controls that you can use to manage your device. From the Control Center, you can adjust the brightness of your screen, control audio playback, enable or disable Wi-Fi and Bluetooth, and much more.
To close the Control Center, simply swipe up from the bottom or down from the top of the screen, depending on your iPhone model. Opening the Control Center is the first step towards turning on screen recording on your iPhone, so let’s move on to the next step.
Customize the Control Center Options
Now that you’ve learned how to open the Control Center on your iPhone, it’s time to customize it to suit your needs.
The Control Center offers various customization options, including the ability to add the screen recording button and rearrange the icons. By personalizing your Control Center, you can have quick access to the features and functions that matter most to you.
Control Center Customization Options
You can easily customize the Control Center options on your iPhone to suit your preferences. The Control Center allows you to access various functions and controls with just a swipe and a tap.
To customize it, go to Settings and tap on Control Center. From there, you can choose which controls you want to include or remove from the Control Center. You can also rearrange the order in which the controls appear.
Additionally, you have the option to add controls for apps that support Control Center. For example, if you frequently use a specific app, you can add its control to the Control Center for quick and easy access.
Adding Screen Recording Button
Customizing the Control Center allows you to conveniently add the screen recording button to your iPhone. To do this, start by opening the ‘Settings’ app on your iPhone.
Scroll down and tap on ‘Control Center.’ From there, select ‘Customize Controls.’ You’ll now see a list of available controls. Look for ‘Screen Recording’ and tap the green plus button next to it. This will add the screen recording button to your Control Center options.
You can rearrange the order of the controls by tapping and holding the three horizontal lines next to each control and dragging them up or down.
Once you have added the screen recording button, you can easily access it by swiping down from the top-right corner of your iPhone screen to open the Control Center, and then tapping the screen recording button.
Rearranging Control Center Icons
To rearrange the Control Center icons and customize your options, follow these steps.
First, open the Settings app on your iPhone. Scroll down and tap on Control Center.
Next, tap on Customize Controls. Here, you’ll see a list of icons that are currently in your Control Center.
To rearrange the icons, simply tap and hold on the three horizontal lines next to the icon you want to move. Then, drag the icon to your desired position.
You can also remove icons by tapping on the red minus button, or add new icons by tapping on the green plus button.
Once you have rearranged and customized your Control Center, simply swipe up from the bottom of your iPhone screen to access it.
Add the Screen Recording Option to Control Center
To customize your Control Center options, you need to add the screen recording option. This will allow you to easily access and enable screen recording on your iPhone.
Control Center Customization
You can easily add the screen recording option to your Control Center on your iPhone. Customizing your Control Center allows you to access features and functions quickly and conveniently.
To add the screen recording option, simply go to your device’s Settings and tap on Control Center. From there, select Customize Controls. You’ll see a list of available controls. Scroll down until you find Screen Recording and tap on the green plus icon next to it. This will add the screen recording option to your Control Center.
Now, whenever you want to start recording your screen, simply swipe down from the top-right corner of your iPhone to access the Control Center and tap on the screen recording icon. It’s that easy!
Enabling Screen Recording
To easily enable screen recording on your iPhone, simply add the screen recording option to your Control Center through the device’s Settings. Here’s how you can do it in a few simple steps.
First, open the Settings app on your iPhone. Scroll down and tap on ‘Control Center.’
Next, tap on ‘Customize Controls.’ You’ll see a list of available controls. Look for ‘Screen Recording’ and tap on the green plus sign next to it. This will add the screen recording option to your Control Center.
Now, you can access screen recording by swiping down from the top-right corner of your iPhone’s screen to open the Control Center and tapping on the screen recording icon.
It’s that easy!
Enable Screen Recording in the Control Center
If you want to easily access screen recording on your iPhone, follow these simple steps to enable it in the Control Center.
First, open the Settings app on your iPhone. It’s the gray icon with gears on the home screen.
Once you’re in the Settings app, scroll down and tap on ‘Control Center.’
In the Control Center settings, you’ll see a list of options. Look for ‘Customize Controls’ and tap on it.
Here, you’ll find a list of controls that you can add or remove from the Control Center. Scroll down until you see ‘Screen Recording’ and tap on the green plus button next to it. This will add screen recording as a control in the Control Center.
To access the Control Center, simply swipe down from the top-right corner of the screen on iPhone X or later models, or swipe up from the bottom of the screen on older iPhone models.
Now, you’ll see a new icon with a white circle inside a white square in the Control Center. Tap on this icon to start screen recording.
That’s it! You’ve successfully enabled screen recording in the Control Center and can now easily access it whenever you need to.
Start Recording Your Iphone Screen
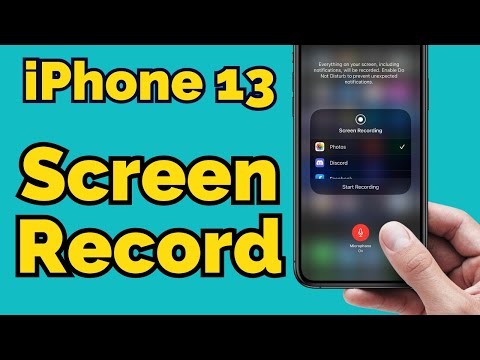
To begin recording your iPhone screen, simply tap on the white circle icon inside the white square in the Control Center. Once you tap on the icon, the recording will start immediately, capturing everything that happens on your screen. You can record any activity on your iPhone, whether it’s a game, a tutorial, or simply showing someone how to navigate through an app.
While recording, a red bar will appear at the top of your screen, indicating that the screen recording is in progress. You can easily stop the recording by tapping on the red bar, or by going back to the Control Center and tapping on the screen recording icon again.
It’s important to note that when you start recording your screen, your iPhone will also capture any audio that’s playing. This means that if you want to include any audio commentary or background music in your recording, make sure to enable the microphone by long-pressing on the screen recording icon in the Control Center, and then toggle on the microphone button.
Once you have finished recording your screen, the video will be saved to your Photos app. From there, you can edit, share, or delete the recording as you wish.
And that’s it! You’re now ready to start recording your iPhone screen and share your amazing moments with others.
Frequently Asked Questions
Can I Use Screen Recording on Older Versions of Iphone Software?
Yes, you can use screen recording on older versions of iPhone software. It allows you to capture your screen activity and save it as a video file for later viewing or sharing.
How Can I Access the Control Center on My Iphone?
To access the Control Center on your iPhone, simply swipe down from the top-right corner of the screen. From there, you can easily navigate to the screen recording option and turn it on.
Is It Possible to Customize the Order of Options in the Control Center?
Yes, you can customize the order of options in the Control Center on your iPhone. Simply go to Settings, then Control Center, and tap on “Customize Controls” to rearrange or add new options.
Can I Add Other Options to the Control Center Besides Screen Recording?
Yes, you can add other options to the control center besides screen recording. Simply go to Settings, Control Center, and customize the controls to include the options you want.
What Are Some Other Ways to Start Recording My Iphone Screen Without Using the Control Center?
To start recording your iPhone screen without using the control center, you can use QuickTime on your computer or third-party screen recording apps from the App Store. These options provide alternative methods for capturing your screen.
Conclusion
In conclusion, turning on screen recording on your iPhone is a simple process that can be done through the Control Center.
By following the step-by-step guide, you can easily enable this feature and start recording your iPhone screen.
Whether you want to capture a tutorial, gameplay, or any other content, screen recording on your iPhone provides a convenient way to do so.